
vagosgta3
RetroNuts!
- Joined
- 7 Ιαν 2008
- Μηνύματα
- 1.887
- Αντιδράσεις
- 32
Πως να αλλαξεις το τροφοδοτικο σε ενα καμμενο PS2
Problem: PS2 won't turn ON, no red standby indicator, no response, nothing.

Solution: You have a faulty power supply.
PS2 (SCPH-39001) PSU specs: 12V DC / 6.2A
Step 1. Remove all screws from the bottom. V7 boards will have 6 screws. Remember where you took out the screws. Remove the top cover.
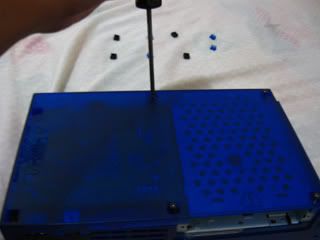
Step 2. Take out more screws . Remove the screws from the controller port and the exhaust fan. Again, remember where you took them out.
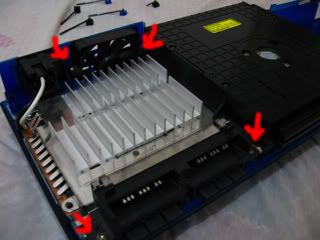
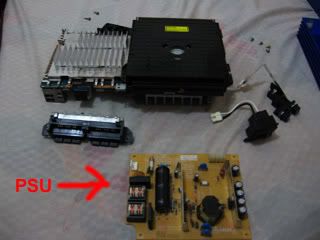
Step 3. Take out the PS2 from the bottom cover. Unscrew the power supply.
Step 4. Sorry I forgot to photo this part while working. Check the fuse with an ohmmeter. If the ohmmeter reads 0 ohms, then the fuse is good. If the ohmmeter readd an infinity or OL ohms, then the fuse is busted.
If the fuse is busted, replace it with a fuse of the same rating. If the fuse is good, then there is really something wrong with your PS2's PSU.
In my case, my fuse was OK. So I checked the DC voltage after the main rectifier, I got 120V DC. Then I checked the 12V output, no reading. So probable cause, the second rectifier is busted. I was suspecting the Schottky Rectifier (STPS2045CT). I asked someone to look at Raon, but unfortunately it was out of stock, then I asked our local mall about a PSU module, they said they will get from Raon and it will cost me 2,500 Php.
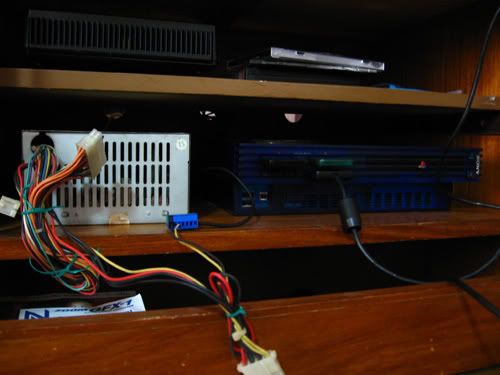
So after 2 weeks, I finally decided to use an old ATX PSU. The ATX PSU had 9A on the 12V rail.
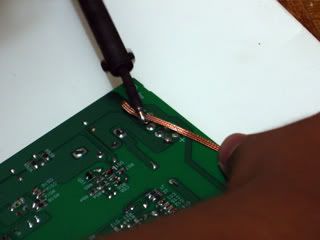
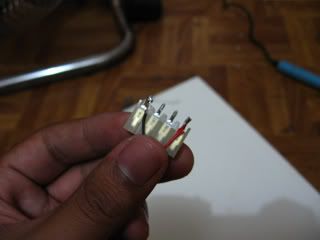
Step 5. Desolder the PS2's PSU connector. It's much easier to use a desoldering wick.
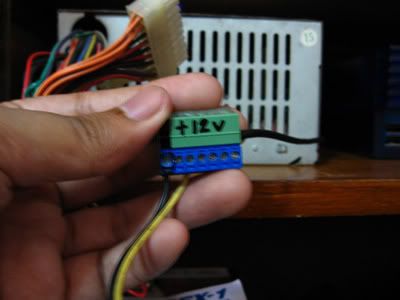
Step 6. (optional) Use a terminal block, this is much easier than soldering the wires to the PS2 itself.
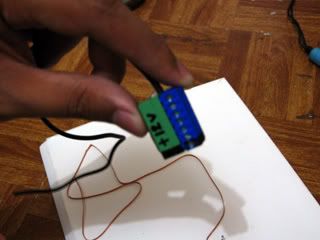
Step 7. Solder the ends of wire from the terminal block the PS2 PSU connector. Take note that the right side of the connector is ( + ) and the left is ( - ).
Step 8. Connect the connector to the PS2's mainboard. The two adjacent pins are common or shorted. Two on the left are ( - ) and two on the right are ( + ).. Be careful on the polarity OK. You can check the polarity by looking the PS2's PSU board.

Step 9. Re-assemble your PS2. (You remember how you took it apart don't you?
Step 10. Cut the yellow and black wire of the ATX PSU. Connect the YELLOW wire to the terminal block connecting the red or ( + ) pin of the PS2.
Then, connect the BLACK wire to the terminal block connecting the black or the ( - ) pin of the PS2.
(again sorry forgot to photo it)
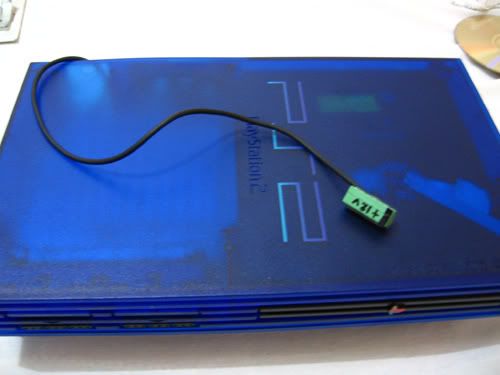
Step 11. Place or short a piece of wire to the green and black wire of the ATX PSU to turn it ON.
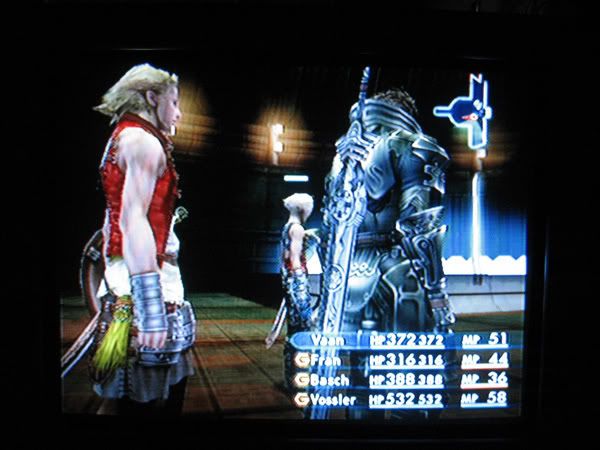
Step 12. Connect the ATX PSU to the terminal block hanging outside the PS2. The PS2's standby RED led should be working now. Turn the PS2 on, place your favorite game and enjoy!
We just saved 2,500Php for a brand new power supply module.

More Pics:
by rashiken
info site
http://www.tipidpc.com/viewtopic.php?tid=79503
Problem: PS2 won't turn ON, no red standby indicator, no response, nothing.
Solution: You have a faulty power supply.
PS2 (SCPH-39001) PSU specs: 12V DC / 6.2A
Step 1. Remove all screws from the bottom. V7 boards will have 6 screws. Remember where you took out the screws. Remove the top cover.
Step 2. Take out more screws . Remove the screws from the controller port and the exhaust fan. Again, remember where you took them out.
Step 3. Take out the PS2 from the bottom cover. Unscrew the power supply.
Step 4. Sorry I forgot to photo this part while working. Check the fuse with an ohmmeter. If the ohmmeter reads 0 ohms, then the fuse is good. If the ohmmeter readd an infinity or OL ohms, then the fuse is busted.
If the fuse is busted, replace it with a fuse of the same rating. If the fuse is good, then there is really something wrong with your PS2's PSU.
In my case, my fuse was OK. So I checked the DC voltage after the main rectifier, I got 120V DC. Then I checked the 12V output, no reading. So probable cause, the second rectifier is busted. I was suspecting the Schottky Rectifier (STPS2045CT). I asked someone to look at Raon, but unfortunately it was out of stock, then I asked our local mall about a PSU module, they said they will get from Raon and it will cost me 2,500 Php.
So after 2 weeks, I finally decided to use an old ATX PSU. The ATX PSU had 9A on the 12V rail.
Step 5. Desolder the PS2's PSU connector. It's much easier to use a desoldering wick.
Step 6. (optional) Use a terminal block, this is much easier than soldering the wires to the PS2 itself.
Step 7. Solder the ends of wire from the terminal block the PS2 PSU connector. Take note that the right side of the connector is ( + ) and the left is ( - ).
Step 8. Connect the connector to the PS2's mainboard. The two adjacent pins are common or shorted. Two on the left are ( - ) and two on the right are ( + ).. Be careful on the polarity OK. You can check the polarity by looking the PS2's PSU board.
Step 9. Re-assemble your PS2. (You remember how you took it apart don't you?
Step 10. Cut the yellow and black wire of the ATX PSU. Connect the YELLOW wire to the terminal block connecting the red or ( + ) pin of the PS2.
Then, connect the BLACK wire to the terminal block connecting the black or the ( - ) pin of the PS2.
(again sorry forgot to photo it)
Step 11. Place or short a piece of wire to the green and black wire of the ATX PSU to turn it ON.
Step 12. Connect the ATX PSU to the terminal block hanging outside the PS2. The PS2's standby RED led should be working now. Turn the PS2 on, place your favorite game and enjoy!
We just saved 2,500Php for a brand new power supply module.
More Pics:
by rashiken
info site
http://www.tipidpc.com/viewtopic.php?tid=79503